Our "Blog Baby" is now 6 weeks old, well settled into its soil, and growing well - a little too well if the truth be told!
It is quite tall and threatening to become a bit lanky. If it is left to its own devices it will just continue doing this and land up as a most unattractive plant with a few flowers right in the tip.
So, it must be "pinched" or "stopped" so that it will stop its headlong upward rush and start to make side branches. The growth hormones in the tip are sending messages to the buds in the leaf nodes down the stem to stop them from developing. We are going to remove the tip which will release the lower buds from bondage and allow them to develop.
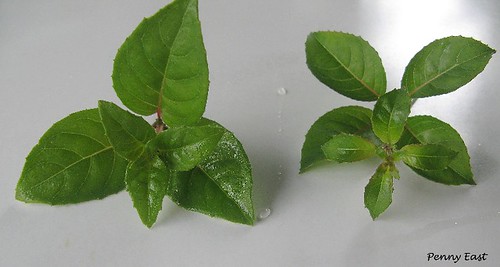
1. This young plant is well settled and growing strongly. It is quite tall and in danger of developing into a lanky teenager.
2.It needs to be pinched out to force the development of side shoots. I'm going to cut quite a lot off it as it has grown quite tall and I prefer to leave only 2 or 3 nodes after the first pinching. Remember that you are aiming to produce a "fat, round" plant with lots of branches. We don't need the height at this stage. This cultivar, 'La Campanella' is a trailing variety so we want lots of side branches to fill a basket.
3. The deed is done! It look quite drastic, I know, but It is better to be a little daring now in order to keep the plant compact and bushy.
4. The piece that was removed will make a perfect cutting for rooting. I admit that I don't usually leave a young plant to get this big before I pinch it, but I'm trying to keep things in order of performance for clarity here!!
5. This is to show the plant as it is now - 'La Campanella' is a cultivar that branches readily on her own, so a couple of the lower nodes have already started to develop without our pinching them. Not all cultivars will do this!
We are on our way to a good bushy plant that will make a beautiful basket!
Remember to turn the plant 90 degrees each week, and feed it with a weak (25%) solution of Seagrow each time it needs to be watered.
"Pinching is an act of kindness!!" :)
More info on each picture can be found HERE
Sunday, May 10, 2009
The First Pinch
Sunday, May 3, 2009
Moving up!
This is the Blog Baby cutting comfortably settled into her new pot and ready to go into the shade house.
Steps for potting up:
First, fill a small (7.5 cm or 3 inch) square pot with moist, loose soil mix.
2. Make a hollow in the middle big enough to receive the root ball of the rooted cutting.
3. Dig a small trowel down into the rooting pot and lift the cutting out disturbing the roots as little as possible in the process.
4. Gently lower the cutting into the hollow you made, making sure that it does not go in deeper than it was in the rooting mix.
5. Gently level the soil out in the pot to cover the roots. Don't be tempted to press or firm it down.
6. Water gently with a slow stream from a small can to settle the soil around the roots.
These steps are documented in pictures HERE if you would like to see more. Pictures no 19 - 25 detail the potting up process.
Economy tip:
I save up the vermiculite left over from each rooting pot until I have enough to fill an old roasting tray. This is then spread out in the tray and put into the oven at 200 C for 2 hours. When it has cooled it is dry and sterile and can be used again for rooting more cuttings, or for adding to the next batch of soil that is made up.
Happy potting!!
Wednesday, April 29, 2009
Wild Weather
The majority of my cuttings are safe and snug and warm in the propagator and were unaffected by the weather,

but the three little "Blog babies" in their small individual pots and plastic bags stand on a fairly exposed shelf, and as I was afraid that they might be blown around, I brought them in to the kitchen window sill until the wind drops. This probably wasn't necessary, but I thought it was better to be safe than sorry as I would hate anything to happen to them now!
I do hope that the rain clears by Friday, otherwise we will have a fairly miserable morning of cutting taking!! The real enthusiasts will not be put off by this, of course!!
Monday, April 27, 2009
Raising Standards
'Phyllis', on the left, is a perfect cutting for growing a standard. It is straight and well balanced and has three leaves at each node. This means that she will make three new branches at each level on the main stem - 50% more branches than a normal cutting with only two leave to the node, and 50% more branches means 50% more flowers on the final plant!
'Mrs Popple', on the right, is a real find!! This shoot has four leaves at each node, which doesn't happen very often. There are tiny buds right at the tip of this cutting, which is not ideal, but nobody is perfect! They are so small right now that I am afraid I will damage the growth point if I try to nip them out, so I will leave them for a little while, and remove them when I can get in there comfortably.
The procedure for taking and rooting cuttings to start new fuchsia standards is the same as for any other fuchsia plant, but I have documented the process in pictures HERE if you would like to know more.
I will track the progress of these two cuttings weekly here until they are mature and flowering.
Hope you had a good long weekend, and are looking forward to the next one! :))
Sunday, April 26, 2009
Cutting - 4 weeks old
The Blog Baby cutting is now 4 weeks old and all can be revealed!
I took the plastic cover off this morning and was delighted to see that there is new growth. This, and the fact that the little cutting resisted a gentle tug are proof that the cutting has rooted and is now a viable young plant!
This means that I can leave the cover off now, and return it to where it was for a week so that it can acclimatise and toughen up a little before I pot it up.
I will have to check the moisture content daily now and water if necessary as it is open to the elements and will dry out quite fast in its tiny pot.
Sunday, April 19, 2009
Cutting - 3 weeks old
It will need a small pot - I use the 7cm square pots because I can pack plenty into the available space, but anything up to about 10cm will do.
Then, something to fill the pot with! There are probably as many recipes for soil mixes as there are fuchsia growers, but this is what I do!
Mix:
1 part potting soil
2 parts compost (not mushroom!)
.5 part well rotted kraal manure
.5 part vermiculite (light weight) or river sand (heavier)
A handful of bone meal
Superphosphate as per manufacturer's instruction
Mix all together well and store in a water tight container for a couple of weeks before use.
I've used this basic mix for years and had very good results with it!
While I'm out shopping for supplies I will also make sure to get in a stock of Seagrow, which is the only food I give to my babies for the first couple of weeks after potting up.
The weather today is cool and damp - perfect fuchsia slipping conditions! - so I'm heading out there to take take plenty of cuttings!
Have a great Sunday whatever you are going to be doing!
Sunday, April 12, 2009
Cutting - 2 Weeks Old
There is generally not much to do in the shade house at present other than dead heading and removing berries ( and weeds - Where do they come from???). All feeding has stopped now until after pruning, and there don't appear to be any insects or diseases around so there is no need to spray. I have reduced watering to every three days as the pots are not drying out too quickly any more.
The new growth is appearing all over the place and there should be plenty of planting material at the end of the month. I am delighted to see that a couple of plants that I had almost written off are recovering in the gentler temperatures and cool dewy nights. I will wait a couple of weeks before I discard anything that looks dead right now - You just never know what can happen!!
Tuesday, April 7, 2009
New cuttings
The weather seems to have cooled down at last, and most of my plants are showing signs of new growth. Autumn is a good time to strike cuttings, which will then grow steadily through the winter and be quite a good size by the time the older plants have recovered from pruning. I am putting lots of cuttings in this year, as many of my plants are old and past their best. When I am sure that the replacements are growing strongly many of the older ones will have to take their chances in the open garden, or be ditched!
Sunday, April 5, 2009
Cutting 1 week old
This cutting was taken on 24th march 2009, and planted into plain Vermiculite. I usually use a mix of 1 part Perlite to two parts Vermiculite, but I was out of Perlite and needed to get the pics done for the notes! It will be interesting to see how the rooting process differs if at all.
After the first week this little cutting is looking fine. The bag is well misted up which shows that there is sufficient moisture, and the cutting looks fresh and crisp. So far, so good!
Remember to place your cuttings in a well lit position that is out of direct sun. Under shadecloth with the rest of your Fuchsias is fine.
Some people keep the cuttings inside on a window sill until they have rooted. I don't have a suitable window and so have never tried this! (I also put in too many cuttings at a time - the window sill would have to be extremely large!!!)
Don't be tempted to remove the cover for at least a month! There really is sufficient moisture in the system to enable the cutting to root.
Saturday, April 4, 2009
Tracking progress
The summer is still dragging on and temperatures are still very high so there have been huge problems with Red Spider Mite and many plants were more or less defoliated. Most of them look terrible!!
The mornings and evenings have begun to cool down, and there are the exciting signs of new growth starting up. There should be some good cutting material in a month or so.
The workshop at the Fuchsia Society meeting today is about propogation. I took a series of pics for Joy's notes and have put them up on Flickr. I intend to follow the progress of this little cutting, week by week on Flickr and here on the blog. I hope to take it all the way to the flowering stage if I can keep it alive that long!! LOL!
This shows the process of taking the cutting and preparing it for rooting.